Fog of War & Tools
This is about tools! Everything you need to stay in control at the table and get Infinite Realms to do what you want quickly and easily. By the way, the Fog of War & Tools Tab can be opened via the F hotkey!
 Fog of War & Tools Tab
Sounds complicated? It’s actually not, as you’ll see in a moment!

By the way, we consider the tools to be absolutely essential and therefore they are all available from the Adventurer Tier upwards without any restrictions! If more tools are added in the future, they will of course be freely available as well!
Movement & Token
On the one hand, there is the scheme known from computer games via the WASD hotkeys. By the way, the keyboard control is an absolute special case!
It works even if the bottom menu is open, which is usually not the case with other tools. It is even possible to move the view with the keyboard while another tool is active!
Alternatively you can use the mouse to move over the map while the movement tool is activated in the top menu. By holding down the left mouse button you can easily move the map.
With the right mouse button you can center the view on the clicked point.
The mouse control behaves like other tools and is not available when the bottom menu is open!
Tokens
Tokens can be manipulated in the Movement Tool as well. Simply click and drag a token to the desired position. You can also move multiple tokens by holding the CTRL key for a token box selection.
For more information on tokens see the Handout & Token Tab tutorial.
Fog of War
The button is highlighted in red and disabled when the fog of war is not enabled. If it is active, you can use it to enable the selected erase tool!
Please keep in mind that you need to close the menu before you can use the tool. You can do so by clicking the arrow on top of the bottom menu or using the hotkey TAB.

The default tool is the Fog Selection tool. With it you can draw a green rectangle with the left mouse button pressed, which reveals the fog of war underneath.
The right mouse button, on the other hand, draws a red rectangle that restores the fog of war.
If you have made a wrong turn, you can cancel the selection at any time by pressing the ESC key!

The size of the brush can be adjusted by the mouse wheel!
Speaking of the Fog of War & Tools tab! There the fog of war can also be switched on and off, as well as be completely blacked out again via the Reset Fog button!
 Fog Brush Shapes
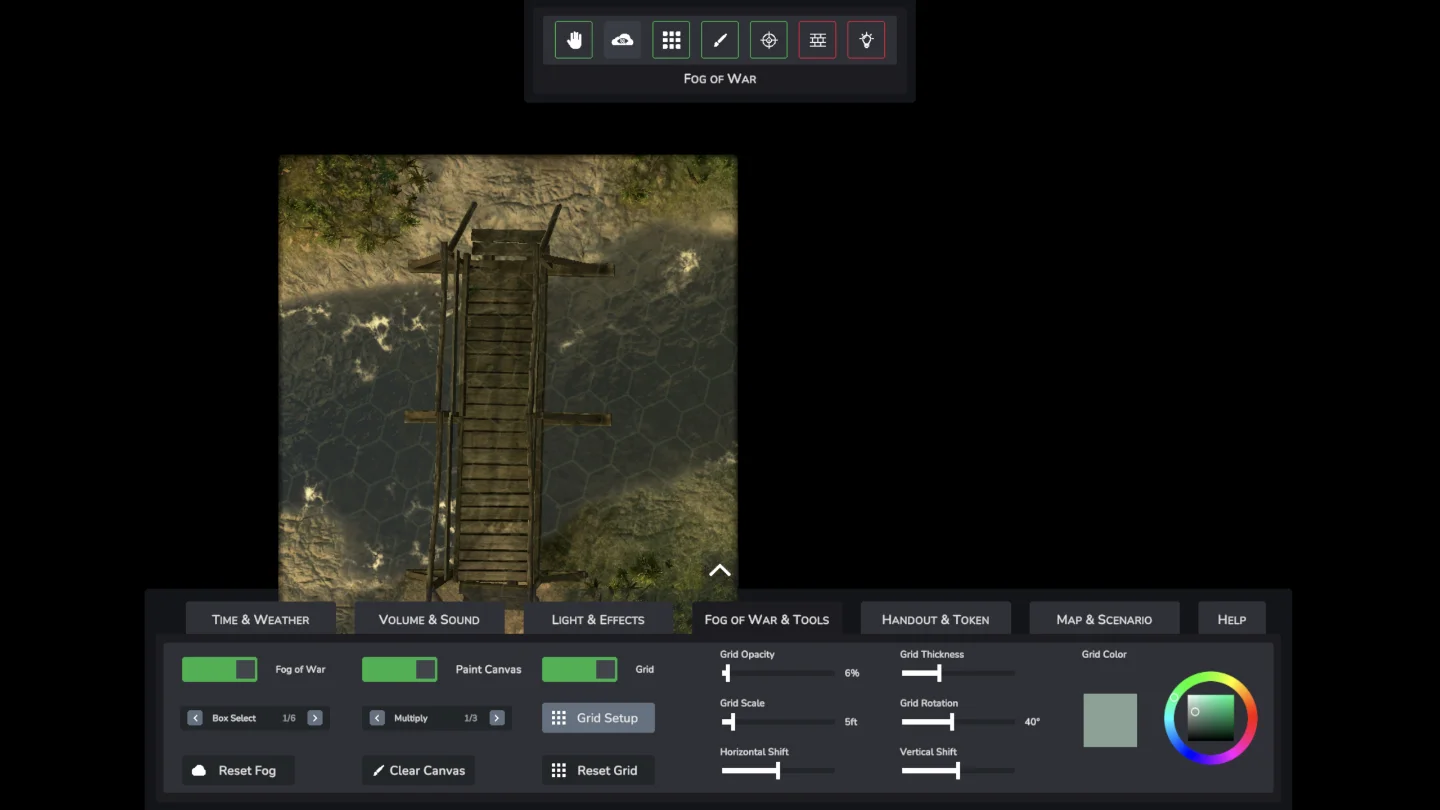
Grid
First there is a switch to turn the grid on and off and a button to reset it. The Grid Setup opens a menu with advanced grid options.
In the Grid Setup windows you can change some presets for the map. First is Type, where you can switch between Square and Hex mode.

You can switch between the following Presets:
- 1 Inch ~ 5 Feet
- 1 Inch ~ 10 Feet
- 1 Inch ~ 2 Meters
- Free Scale
The Free Scale option is equivalent to 1 cm ~ 1m and is meant as a solid base for the Grid Scale slider in the bottom menu. Please keep in mind that all these calculations are dependent on the Screen Diagonal that can be configured in the Settings.
 Grid Tool Options
With the slider Grid Scale the size can be adjusted manually. Under normal circumstances you should not need this slider as the most frequent scale presets can be set in the Grid Setup window.
Grid Rotation can be used to adjust the grid to any angle your scene may require.
Grid Opacity and Grid Thickness sliders define how well the grid is visible against the background. The results can also vary drastically depending on the background and color of the grid.
The two Shift sliders at the bottom right can be used to move the grid horizontally and vertically.
With the color wheel to the right you can set the Color of the grid.
 Some Grid Tool styles
Grid Highlight & Markings
The active part of the Grid Tool can be accessed in the top menu. It can be used to temporarily mark areas on the grid.
Activating the tool will open a side menu with some configuration options. The tool can be accessed by the hotkey 3

- Intersection - origin is an intersection between cells, default for D&D and Pathfinder
- Center - origin is a central grid cell, creating a different shape than intersection
- Box - a box made up of cells, certain spells use this
- Cone (Experimental) - a cone made up of cells, angle can be set
Color and Opacity define the look of the marked cells. Range sets the size of the cell selection.
Cone Angle sets the width of the cone option.
The tool will start blinking in the currently set shape as soon as the menu is closed. Range can also be set by the mouse wheel, no need to re-open the menu.
Clicking left will print the shape onto the grid at the selected location. Printed shapes can also be removed by right clicking.
This tool creates temporary markings only. They are not saved in any way.
Marking & Paint


As soon as the tool is selected, a menu for configuring the brush appears on the left side of the screen. Here you can choose between a few shapes. There is also a color wheel available.
After closing the menu via the arrow at the bottom menu or the hotkey TAB you can start painting!
Please note that the color that is finally visible on the canvas depends in the Multiply and Additive modes on the type of the calculation with the background!
 Multiply, Additive and Opaque Modes
Line of Sight & Distance
Once the tool is selected in the top menu, you can left-click on any point in the scene. Now the starting point is set and the measurement starts. Data will now be displayed next to the cursor. On the one hand the distance from the start point to the position of the cursor and on the other hand the height relative to the ground level.

The height relative to the ground level can be adjusted with the mouse wheel. This also works in the negative range, which can sometimes make sense in 3D scenes! With a second left click you set the target point and the measurement is constantly displayed at the cursor.
You can cancel the measurement at any time by pressing ESC or right-clicking. If two points are already set, the measurement will be deleted. By the way, it is only possible to delete a measurement if the Line of Sight & Distance tool is active!
In 3D scenes the line of sight can be colored red. This means that a 3D object is in the line of sight and interrupts it.
However, since this object may be a very small, narrow or semi-transparent object such as a bush, the red or green coloring of the line of sight should, in case of doubt, be regarded by the game master as a recommendation rather than as absolute truth!
Legacy Map Virtual Walls
With its help, virtual walls can be drawn on a 2D map, which can affect several functions:

- Block Lights
- Display an interrupted Line of Sight
- Model the Dynamic Brush in the Fog of War tool
- Model the Dynamic Brush of Tokens tool
With the Walls tool activated, a new wall can be started with a left click. Additional points or corners are added with further clicks.
The active wall is displayed in a vibrant green. The end of the last set segment is connected to the cursor, so you can easily see what the next segment to be placed would look like.

The active wall can be deleted with DEL or BACKSPACE. The deletion takes place immediately; there is no safety query.
Any number of walls can be placed, however, it is recommended to create as long segments as possible at a time. For closed doors, very short walls can be inserted, which can be removed later.
The green wall segments are only visible on the GM screen and while the Walls tool is active.
Legacy Map Point Lights

With the Lights tool activated, new lights can simply be set with a left click. A new light is white, has low intensity, and range.
The context menu of the light can be accessed via a right click. Here, color, intensity, and range can be adjusted continuously. Additionally, there are buttons to duplicate or delete the light.
With ESC or a right click into the void, the light can be deselected. With a click on an existing light, it becomes active again. An active light can be identified by the X-shaped arrows below it.
These arrows also indicate that the active light can be dragged to a new position.
The light bulb symbols are only visible on the GM screen and while the Lights tool is active.
Video

It was recorded some time ago with Infinite Realms version 2021.1.2 and is thus not up to date, e.g. the Paint Tool is missing.
But the basic principles and workflow still apply!
Click the cover picture to watch on YouTube!